Converting A 2.5 NA in to a 200tdi (big file)
+2
tat2_al
jonmcghee
6 posters
Page 1 of 1
 Converting A 2.5 NA in to a 200tdi (big file)
Started out with a ex RAF 110 defender running a 2.5NA diesel engine, this in its self is a good hardy engine but when manufactured only produces 64 bhp and after a few years of service I would expect it to be less, so running 2.1 tons of landy (unladden) and towing on a regular basis I decided I needed a few more horses under the bonnet. So looking around at all the options I decided to go for a 200tdi engine, this being a common upgrade. The hunt was on for a battered disco or defender for an engine.
After a few weeks of looking in all the usual places I got wind of a defender, rotten but with good running gear, so I went for it and took delivery.
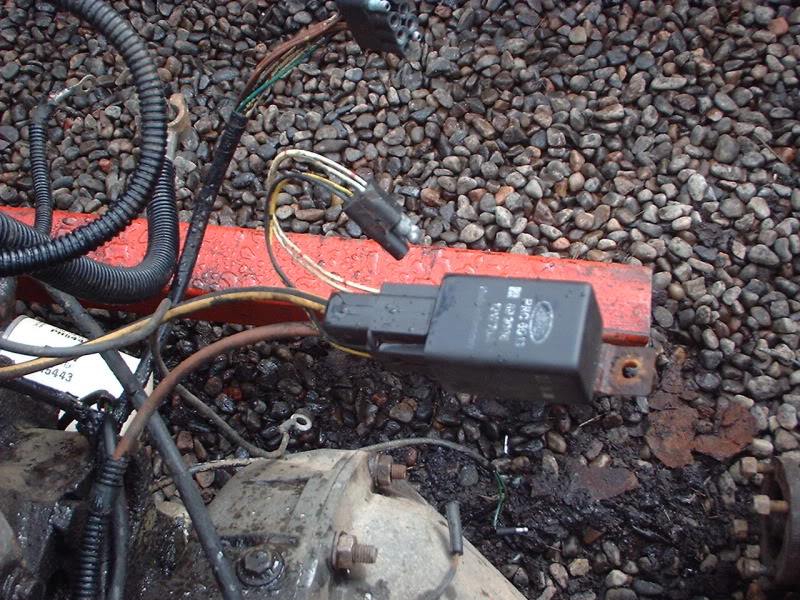
So the fun started, striped out the engine and box out of the old defender, this included rad, intercooler, power steering setup and expansion bottle. The exhaust was good so that was kept as well to be modified (but thatís another story) One of the points I had previously read is that the glow plugs have a different setup from the 2.5na The 200tdi runs a relay setup that wires direct to the battery not via the starter motor power feed so if you are doing it yourself make sure you get the relay.
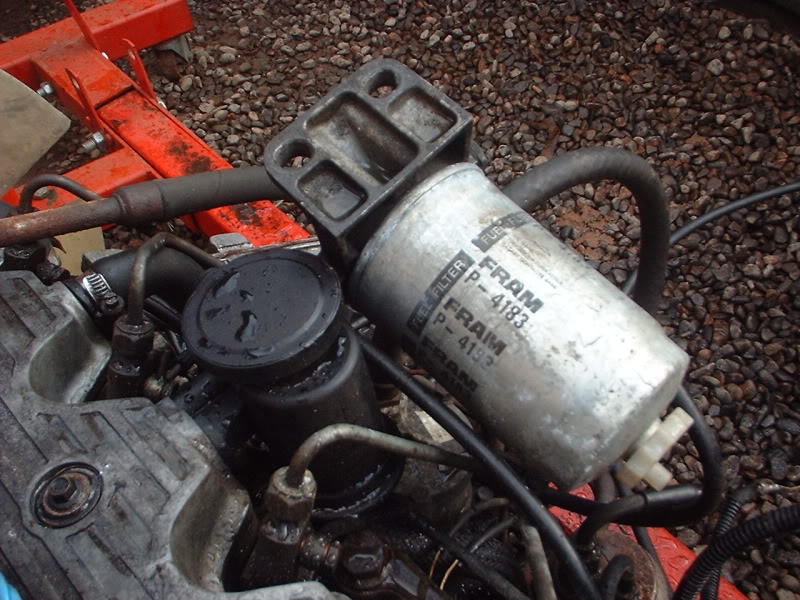
You also need to make sure you get the fuel filter set up as this is different to the 2.5na.
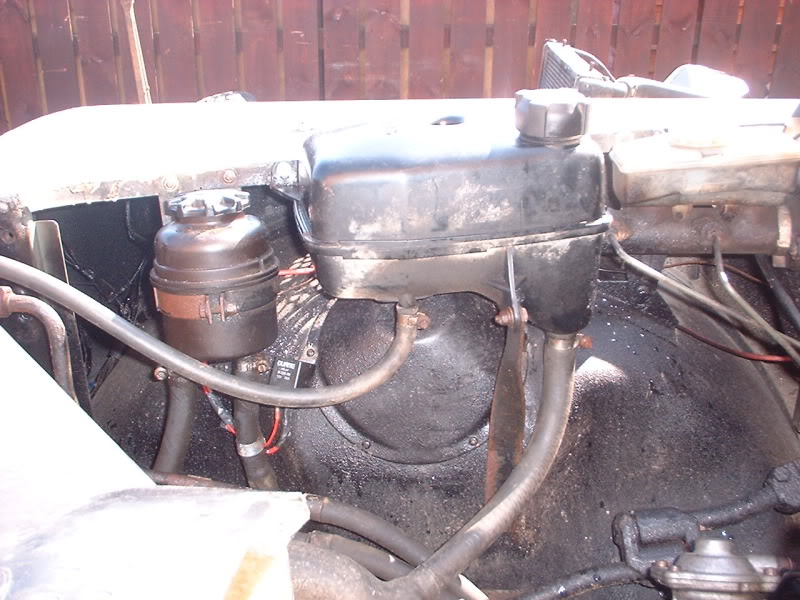
The expansion bottle is different so this is another part you need to make sure is included in your parts list along with rad/intercooler setup this also has an oil intercooler built in.
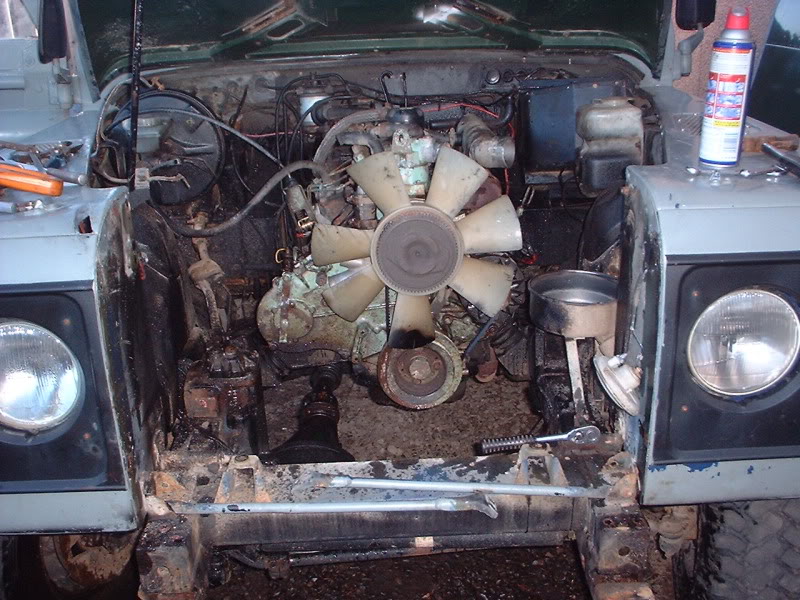
Right now the fun starts, strip old engine out (easy I here you say) I will let you decided that one. Now you will need to remove the gear stick from the inside, unscrew the knobs and then ease up the rubber that covers them and you will see a nut holding on the main gear shift, undo and off it comes, while you are inside disconnect the battery. Now at the front, I found it a lot easier to strip the front end out completely (this can be a bugger if you start coming across the rust worm thatís attacked the bolts) remove the rad and the air cleaner along with associated pipe work.
Start going round the engine disconnecting the usual throttle, fuel lines now undo the one to the lift pump (it will reconnect to 200tdi and the return you can just cut close to the joint) unbolt the filter assembly and rest on engine, there is an electrical connection around the same area disconnect this, and along the bulk head the connection for glow plugs is there disconnect that too. Moving along you come to the heater with two pipes that need disconnecting, moving down you have starter motor feed to remove, clutch flexi needs taken off from bulkhead, then the exhaust ( removed it all as its getting modified) donít forget the earth strap down by the engine mount. Now at this point I undid the nuts on the top of engine mounts and moved in the engine hoist and connected to the engine. Moving underneath both drive shafts need disconnected from transfer box and the Speedo connection is there at the back of hand brake and donít forget the connection for the dif light on the other side of the box.
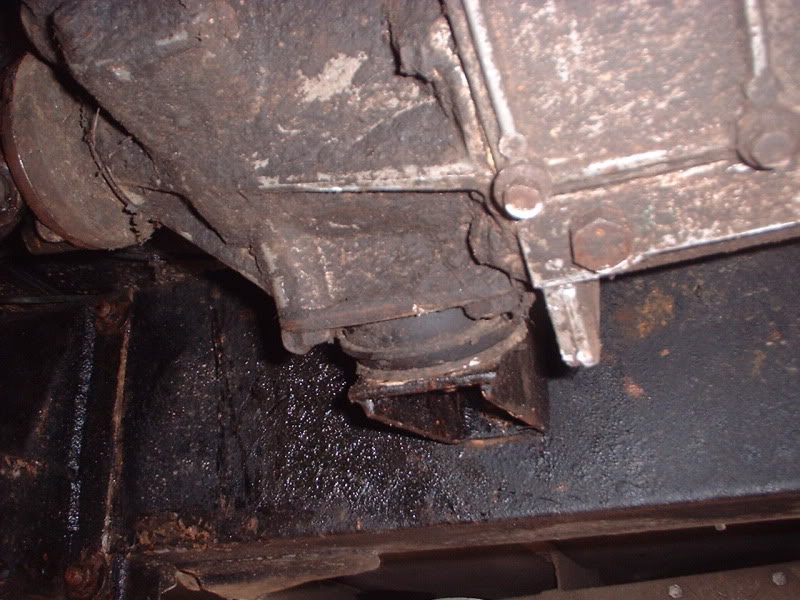
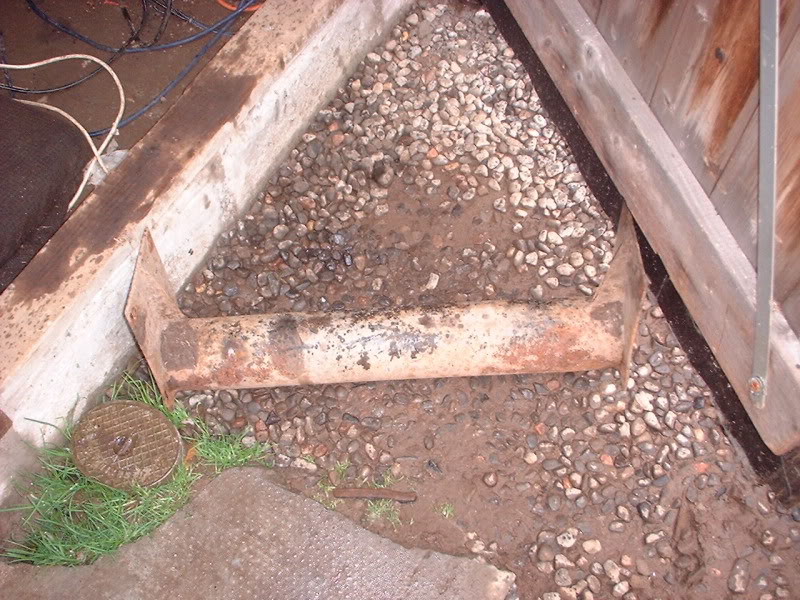
Next you will need to remove the bar that crosses from chassis rail to chassis rail, four bolts on each side if its anything like mine it will be tight in and the use of a sledge hammer helps to remove it,
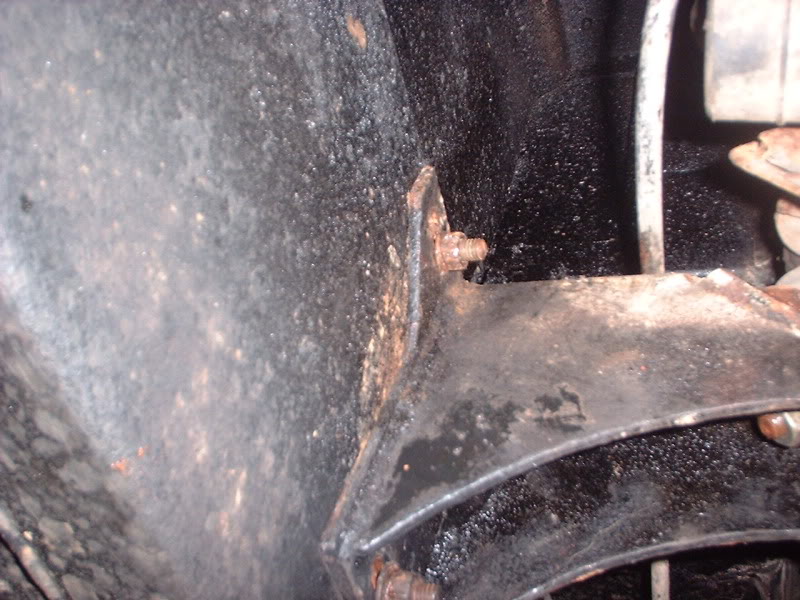
now the gear box mounts you will need a jack to take the weight of the gear box, undo rubber mount nuts and jack up box, then you will need to remove the brackets three bolts in each, once this is done lower the box all the way down, I now disconnected the hand brake cable as it was easy to get at.
engine and box needs lifted out this has to be done at a good 45 degrees angle if not more to make sure gear leaver and high/low selector clears the bulkhead.
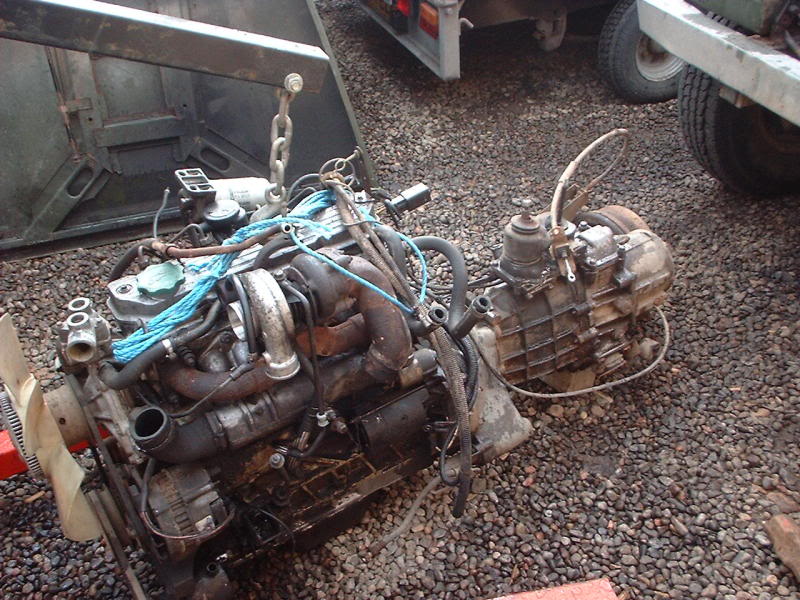
Sorted, engine out now while engine it out remove the bottom of the air box, the steering box and the holder for the old header tank.


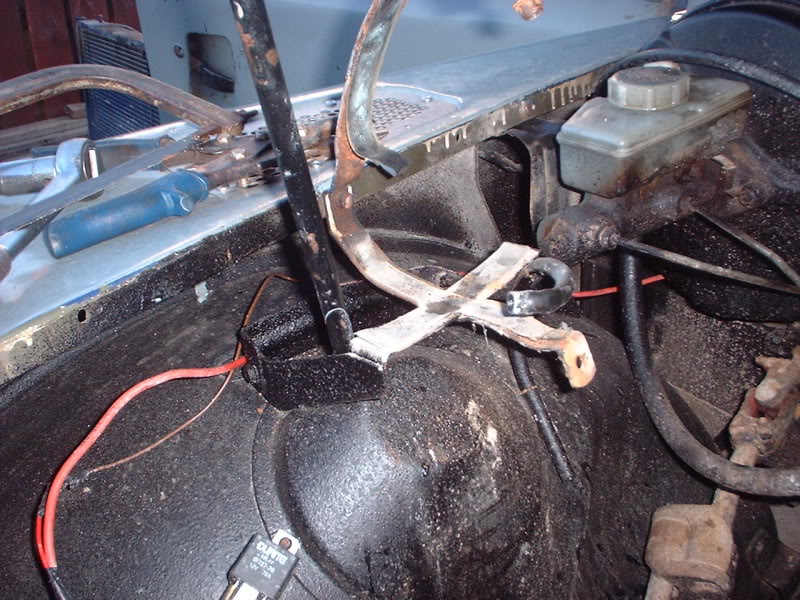
Right time to put it all back; engine first at +45 degree angle (with a lot of shoving and pushing) once in line roughly, time to put a jack under the gear box and start jacking up, watch when jacking back up that the gear selectors donít get caught on the side of the gear box tunnel. I first lined up the exhaust side engine mounting and loosely put nut on, then underneath and re-bolted the gear box mounts and lowered the gear box back down and bolted up the rubber mounts, then taking the weight off the engine hoist, and with a crow bar worked the last engine mounting into place (itís a bugger to do) then tighten everything up.
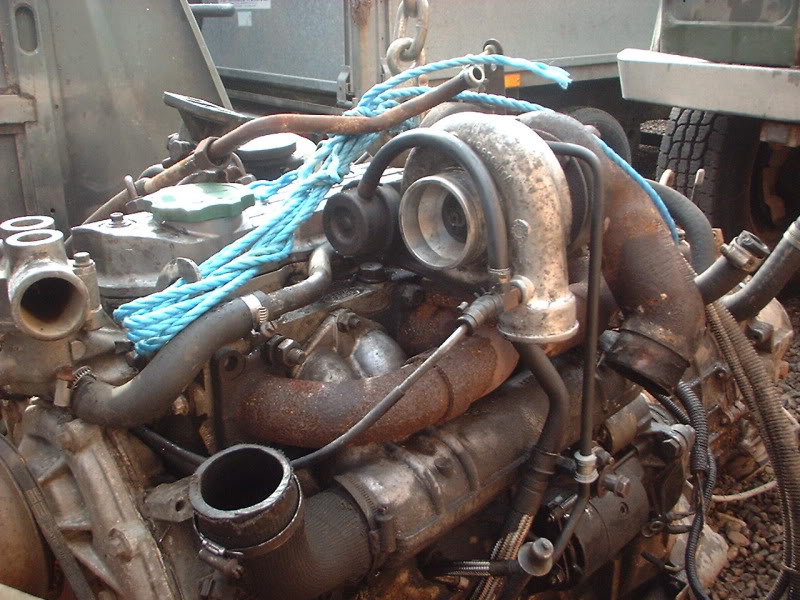
Next I mounted up the steering box and connected pipe work, moving on round the engine. Throttle, mount fuel filter, connect fuel pipes (connection on to lift pump is easy just bolts on, as for the return I tried heating the pipe to get it to go on etc etc but I ended up using a bit of rubber hose to connect the two), electrics plug up (I have not done glow plug connection yet will update later) starter motor electrics, exhaust. Then mounting the rad and connecting up all the pipe work and donít forget the pipes for your heater. You will need to drill new holes for the header tank. Hopefully that should be all, donít forget to bleed fuel system.

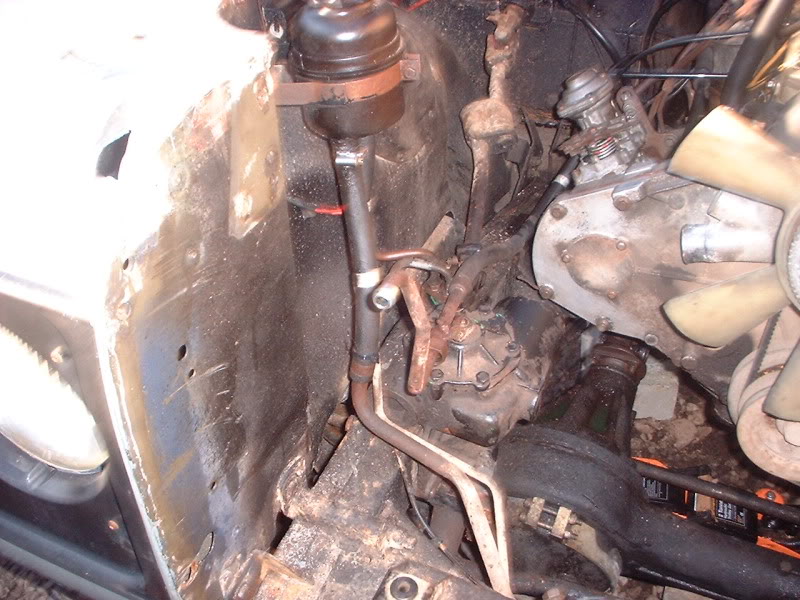
Ok underneath two drive shafts, handbrake (might find this easier accessing from middle seat from inside) and donít forget the Speedo cable, and the flexi for the clutch donít forget needs bled.
Inside need to reconnect the main gear lever, pop on the gator and then both knobs.
Fill up with water, steering fluid, oil and clutch fluid then turn the key.
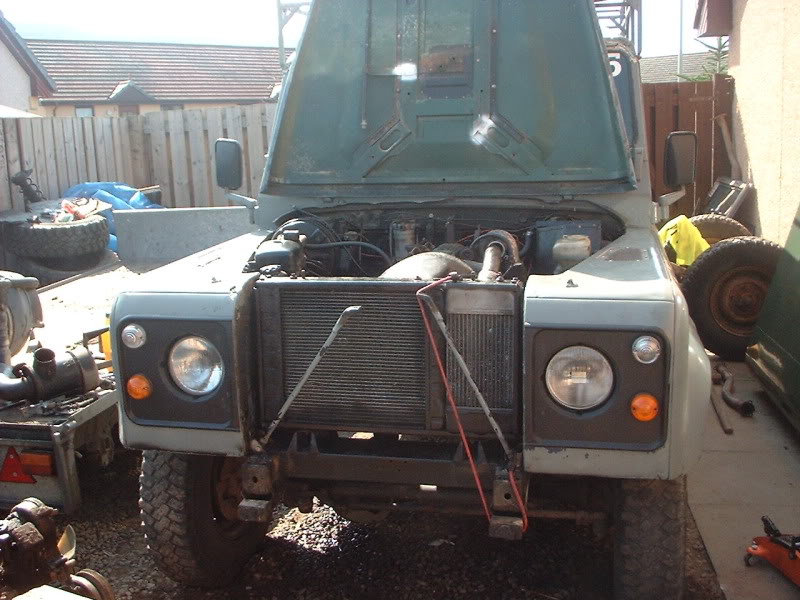
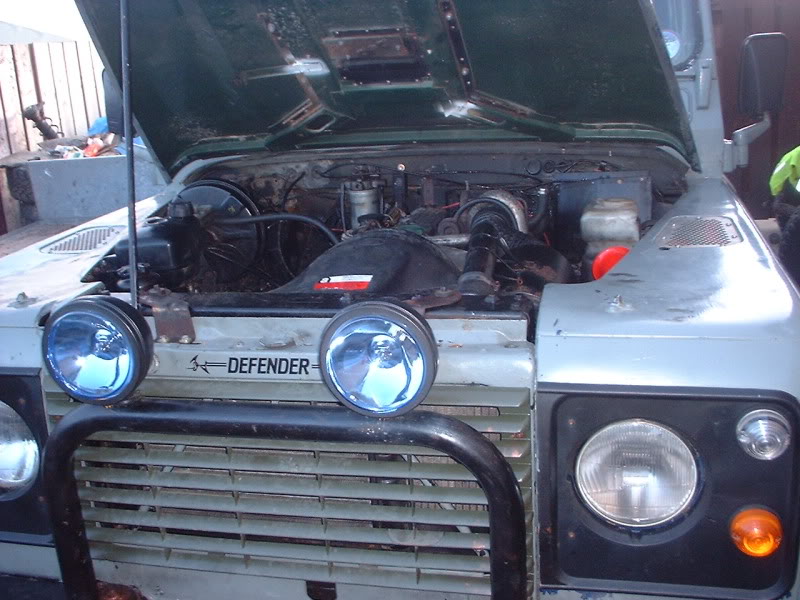
Right hopefully thatís it the air will probably be blue at times, you will be lacking some chunks of skin, and be very close to a divorce (if) married but it is well worth it because the first time you take it out on the road with the new engine, you will come back with a big stupid grin on your face and start forgetting about the bad bits.
This is the way I did it, you might not agree, find an easier way or I may of missed something. Please remember it is only a guide and not gospel and all mechanics are dangerous so be careful.
After a few weeks of looking in all the usual places I got wind of a defender, rotten but with good running gear, so I went for it and took delivery.
So the fun started, striped out the engine and box out of the old defender, this included rad, intercooler, power steering setup and expansion bottle. The exhaust was good so that was kept as well to be modified (but thatís another story) One of the points I had previously read is that the glow plugs have a different setup from the 2.5na The 200tdi runs a relay setup that wires direct to the battery not via the starter motor power feed so if you are doing it yourself make sure you get the relay.

You also need to make sure you get the fuel filter set up as this is different to the 2.5na.

The expansion bottle is different so this is another part you need to make sure is included in your parts list along with rad/intercooler setup this also has an oil intercooler built in.

Right now the fun starts, strip old engine out (easy I here you say) I will let you decided that one. Now you will need to remove the gear stick from the inside, unscrew the knobs and then ease up the rubber that covers them and you will see a nut holding on the main gear shift, undo and off it comes, while you are inside disconnect the battery. Now at the front, I found it a lot easier to strip the front end out completely (this can be a bugger if you start coming across the rust worm thatís attacked the bolts) remove the rad and the air cleaner along with associated pipe work.

Start going round the engine disconnecting the usual throttle, fuel lines now undo the one to the lift pump (it will reconnect to 200tdi and the return you can just cut close to the joint) unbolt the filter assembly and rest on engine, there is an electrical connection around the same area disconnect this, and along the bulk head the connection for glow plugs is there disconnect that too. Moving along you come to the heater with two pipes that need disconnecting, moving down you have starter motor feed to remove, clutch flexi needs taken off from bulkhead, then the exhaust ( removed it all as its getting modified) donít forget the earth strap down by the engine mount. Now at this point I undid the nuts on the top of engine mounts and moved in the engine hoist and connected to the engine. Moving underneath both drive shafts need disconnected from transfer box and the Speedo connection is there at the back of hand brake and donít forget the connection for the dif light on the other side of the box.

Next you will need to remove the bar that crosses from chassis rail to chassis rail, four bolts on each side if its anything like mine it will be tight in and the use of a sledge hammer helps to remove it,

now the gear box mounts you will need a jack to take the weight of the gear box, undo rubber mount nuts and jack up box, then you will need to remove the brackets three bolts in each, once this is done lower the box all the way down, I now disconnected the hand brake cable as it was easy to get at.

engine and box needs lifted out this has to be done at a good 45 degrees angle if not more to make sure gear leaver and high/low selector clears the bulkhead.

Sorted, engine out now while engine it out remove the bottom of the air box, the steering box and the holder for the old header tank.


Right time to put it all back; engine first at +45 degree angle (with a lot of shoving and pushing) once in line roughly, time to put a jack under the gear box and start jacking up, watch when jacking back up that the gear selectors donít get caught on the side of the gear box tunnel. I first lined up the exhaust side engine mounting and loosely put nut on, then underneath and re-bolted the gear box mounts and lowered the gear box back down and bolted up the rubber mounts, then taking the weight off the engine hoist, and with a crow bar worked the last engine mounting into place (itís a bugger to do) then tighten everything up.

Next I mounted up the steering box and connected pipe work, moving on round the engine. Throttle, mount fuel filter, connect fuel pipes (connection on to lift pump is easy just bolts on, as for the return I tried heating the pipe to get it to go on etc etc but I ended up using a bit of rubber hose to connect the two), electrics plug up (I have not done glow plug connection yet will update later) starter motor electrics, exhaust. Then mounting the rad and connecting up all the pipe work and donít forget the pipes for your heater. You will need to drill new holes for the header tank. Hopefully that should be all, donít forget to bleed fuel system.


Ok underneath two drive shafts, handbrake (might find this easier accessing from middle seat from inside) and donít forget the Speedo cable, and the flexi for the clutch donít forget needs bled.
Inside need to reconnect the main gear lever, pop on the gator and then both knobs.
Fill up with water, steering fluid, oil and clutch fluid then turn the key.


Right hopefully thatís it the air will probably be blue at times, you will be lacking some chunks of skin, and be very close to a divorce (if) married but it is well worth it because the first time you take it out on the road with the new engine, you will come back with a big stupid grin on your face and start forgetting about the bad bits.
This is the way I did it, you might not agree, find an easier way or I may of missed something. Please remember it is only a guide and not gospel and all mechanics are dangerous so be careful.

jonmcghee- Posts : 334
Join date : 2009-11-02
Age : 52
Location : drumnadrochit
 Re: Converting A 2.5 NA in to a 200tdi (big file)
Look excellent, I assume that it is much easier to replace all (engine/gearbox) than just engine?
 Re: Converting A 2.5 NA in to a 200tdi (big file)
Excellent write up!
You're making me feel guilty fot not having written about mine!
I did do things slightly differently, the main one being that it was only the engine I changed, and mated it to my existing gearbox.
This meant everything was done from the front, and gave me the opportunity to put in a new clutch while it was accessable.
This did however present it's own set of problems, as it initially appeared to have a compatibility issues as the clutch wouldn't work... it turned out to be a worn fork pivot, so it pays to replace every clutch component if you're doing any of them.
I had to cut off the radiator brackets on the front crossmember then re weld them 27mm lower to allow the radiator and intercooler to fit, but this wasn't difficult, I also had to cut off the mounting lugs on the radiator frame as it had come from the discovery, these were then welded onto the top to utilise the existing defender mounts.
I will add some of my pictures and further info about mine tonight as mine was originally petrol, so it covers the job from a different perspective and it'll be a valuable point of reference for anyone planning on doing this conversion!
 Re: Converting A 2.5 NA in to a 200tdi (big file)
Thanks guys  I was lucky in that the defender rad does not need alterd at all.

jonmcghee- Posts : 334
Join date : 2009-11-02
Age : 52
Location : drumnadrochit
 Re: Converting A 2.5 NA in to a 200tdi (big file)
Job well done mate give tourself a big pat on the back 

 Re: Converting A 2.5 NA in to a 200tdi (big file)
Very good write up, lots of good piccies too (some of us cant read) hope you have many good motoring miles yet.


gti-90- Posts : 214
Join date : 2009-04-14
Location : Dalwhinnie
 Re: Converting A 2.5 NA in to a 200tdi (big file)
engine running like a dream but i think the front trasfer bearing has gone so that will need done 


jonmcghee- Posts : 334
Join date : 2009-11-02
Age : 52
Location : drumnadrochit
 Re: Converting A 2.5 NA in to a 200tdi (big file)
on lr4x4 there is a great writeup on how to do the front bearing if your stuck, though i believe its a piece of cake. youle need a big bearing puller i think. 


gti-90- Posts : 214
Join date : 2009-04-14
Location : Dalwhinnie
 Re: Converting A 2.5 NA in to a 200tdi (big file)
gti-90 wrote:on lr4x4 there is a great writeup on how to do the front bearing if your stuck, though i believe its a piece of cake. youle need a big bearing puller i think.
 thats the one i found
got big pullers so ok there

jonmcghee- Posts : 334
Join date : 2009-11-02
Age : 52
Location : drumnadrochit
 Re: Converting A 2.5 NA in to a 200tdi (big file)
With my engine having come from a Discovery, there are a few differences from that of the defender 200tdi engine that John has used.
The turbo on the disco lump sits much lower down and therefore gives some issues with the exhaust downpipe clearing the nearside chassis rail. I overcame this by buying a ready made downpipe from a seller on Ebay that has perfected the manufacture to make this simple. It's visible along with the new clutch in this pic:

Before fitting the new engine, the clutch pipe bracket on the bulkhead needs cut off and moved as far to the nearside as possible to clear the exhaust downpipe.
Because the engine sits much further forward in the disco than it does in the defender, I had to have the oil cooler pipes extended, it's well worth getting this done professionally, as it really isn't expensive Macgregors hydraulic department in Inverness did mine.
My 90 already had power steering, but I utilsed the fluid resovoir and the high pressure steering pipe from the disco. The pipe isn't quite long enough, and it's the wrong shape, so I had it modified at the same time as the oil cooler pipes, I basicly just used the ends and replaced the rest with high pressure flexi hose. All of these hoses were extended by about 5 inches.
The low pressure return pipe was made up from a mixtre of cutting back the steel pipe, and fitting the rubber hoses cut down to fit at either end, and fastened secuerly with jubilee clips.
The intercooler pipes from the disco are all too short, so I bought the kit (same guy on ebay) that is designed for this conversion, it fits straight out of the box and saves a huge anount of fiddling. I made up radiator hoses from a mixture of the parts from both vehicles, having to cut and join some, but I'm pleased with how it now looks.
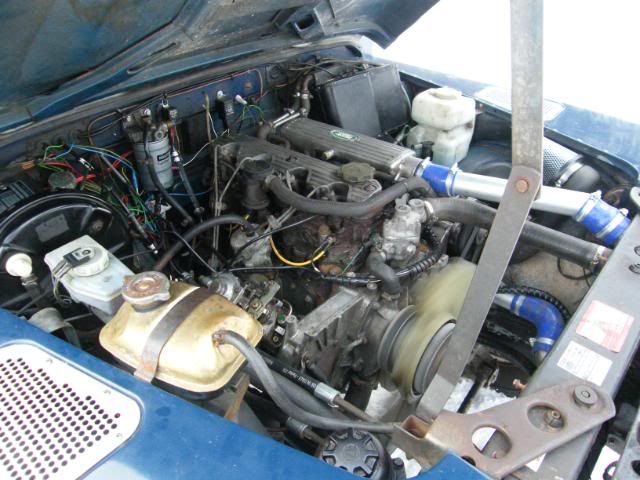
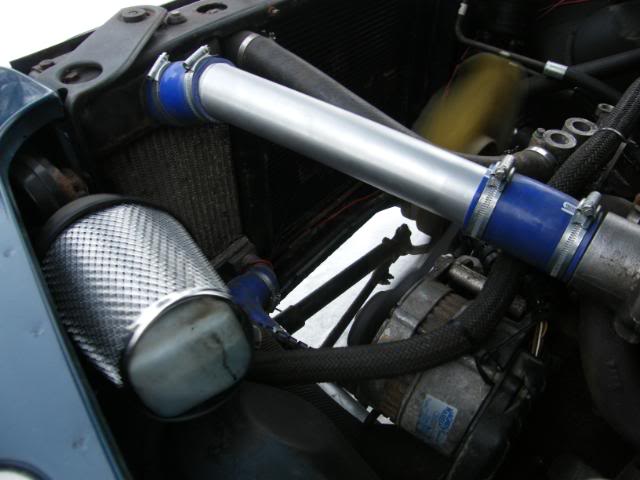
Because my 90 was originally petrol, I fitted the diesel fuel filter housing where the coil used to be on the bulkhead. Contrary to popular belief, early petrol 90's/110's actually DO have a fuel return pipe that runs from the swirl pot before the carb, this was utilised for the diesel return with the swirl pot removed.
Make sure the petrol in-line filter is removed.... they don't like diesel (ask me how I know!)
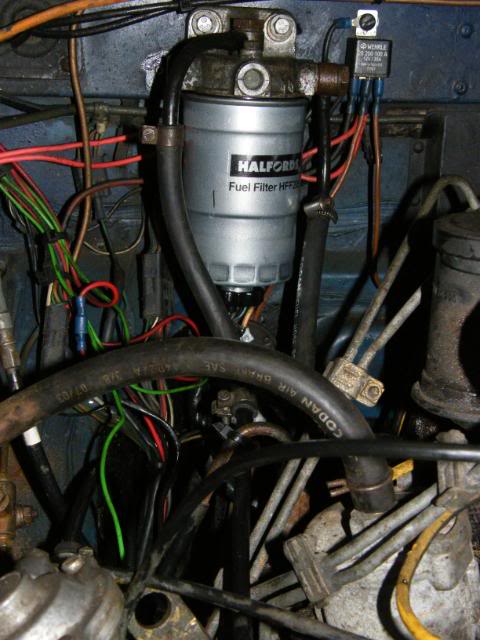
Time to get the circut tester out... For the fuel pump solenoid you need to find a wire that is live with the ignition on, and the engine running, which doesn't momentarily cut off at any point of the ignition key turning. I was originally advised the wire to the coil was fine for this, but it wasn't, it had a momnetary dead spot while the key was let go, meaning the engine stalled as soon as it had been started.
For the glow plug relay, I only used the heavy brown cable to a main feed, black to earth, and the plain white wire to an ignition live. I made sure the white wire was to a source that wasn't live with the engine running. The white wire operates the timer in the relay, which automaticly pre heats as soon as the ignition is on. I added a neat wire to the old choke light on the dash panel so it lights up while pre heating.
I used the wiring loom from my old engine, most of it was a perfect fit. I had to cut off the plug for the alternator and crimp eye connections on, but otherwise everything fitted the same.
The temperture sender in this engine isn't matched to the 90 guage, it reads too hot, but there is a sender unit available from Steve Parker conversions just for this conversion, I'm about to order one. The alternative is to fit the guage from a 200tdi defender.
The difference to the vehicle with this engine fitted is absolutely outstanding, and worth every freezing workshop hour, and skinned knuckle!
I'm sure there is lots I've missed, and I really should have written this at the time!
if anyone reading this has questions, just ask
roz31573@hotmail.com
The turbo on the disco lump sits much lower down and therefore gives some issues with the exhaust downpipe clearing the nearside chassis rail. I overcame this by buying a ready made downpipe from a seller on Ebay that has perfected the manufacture to make this simple. It's visible along with the new clutch in this pic:

Before fitting the new engine, the clutch pipe bracket on the bulkhead needs cut off and moved as far to the nearside as possible to clear the exhaust downpipe.
Because the engine sits much further forward in the disco than it does in the defender, I had to have the oil cooler pipes extended, it's well worth getting this done professionally, as it really isn't expensive Macgregors hydraulic department in Inverness did mine.
My 90 already had power steering, but I utilsed the fluid resovoir and the high pressure steering pipe from the disco. The pipe isn't quite long enough, and it's the wrong shape, so I had it modified at the same time as the oil cooler pipes, I basicly just used the ends and replaced the rest with high pressure flexi hose. All of these hoses were extended by about 5 inches.
The low pressure return pipe was made up from a mixtre of cutting back the steel pipe, and fitting the rubber hoses cut down to fit at either end, and fastened secuerly with jubilee clips.
The intercooler pipes from the disco are all too short, so I bought the kit (same guy on ebay) that is designed for this conversion, it fits straight out of the box and saves a huge anount of fiddling. I made up radiator hoses from a mixture of the parts from both vehicles, having to cut and join some, but I'm pleased with how it now looks.


Because my 90 was originally petrol, I fitted the diesel fuel filter housing where the coil used to be on the bulkhead. Contrary to popular belief, early petrol 90's/110's actually DO have a fuel return pipe that runs from the swirl pot before the carb, this was utilised for the diesel return with the swirl pot removed.
Make sure the petrol in-line filter is removed.... they don't like diesel (ask me how I know!)

Time to get the circut tester out... For the fuel pump solenoid you need to find a wire that is live with the ignition on, and the engine running, which doesn't momentarily cut off at any point of the ignition key turning. I was originally advised the wire to the coil was fine for this, but it wasn't, it had a momnetary dead spot while the key was let go, meaning the engine stalled as soon as it had been started.
For the glow plug relay, I only used the heavy brown cable to a main feed, black to earth, and the plain white wire to an ignition live. I made sure the white wire was to a source that wasn't live with the engine running. The white wire operates the timer in the relay, which automaticly pre heats as soon as the ignition is on. I added a neat wire to the old choke light on the dash panel so it lights up while pre heating.
I used the wiring loom from my old engine, most of it was a perfect fit. I had to cut off the plug for the alternator and crimp eye connections on, but otherwise everything fitted the same.
The temperture sender in this engine isn't matched to the 90 guage, it reads too hot, but there is a sender unit available from Steve Parker conversions just for this conversion, I'm about to order one. The alternative is to fit the guage from a 200tdi defender.
The difference to the vehicle with this engine fitted is absolutely outstanding, and worth every freezing workshop hour, and skinned knuckle!
I'm sure there is lots I've missed, and I really should have written this at the time!
if anyone reading this has questions, just ask
roz31573@hotmail.com
 Re: Converting A 2.5 NA in to a 200tdi (big file)
lookin good Roz 

muddy- Posts : 48
Join date : 2010-03-30
Age : 32
Location : drum
 Re: Converting A 2.5 NA in to a 200tdi (big file)
Looks very neat Roz  exellent job, your engine bay looks so much cleaner than mine

jonmcghee- Posts : 334
Join date : 2009-11-02
Age : 52
Location : drumnadrochit
 Re: Converting A 2.5 NA in to a 200tdi (big file)
jonmcghee wrote:Looks very neat Rozexellent job, your engine bay looks so much cleaner than mine
Bet he washed it specially for the camera

 Re: Converting A 2.5 NA in to a 200tdi (big file)
Just an update, I ordered and fitted the temperature sender from Steve parker conversions, and the gauge now reads accurately. very worthwhille for £8.99 including postage!
 Re: Converting A 2.5 NA in to a 200tdi (big file)
tat2_al wrote:jonmcghee wrote:Looks very neat Rozexellent job, your engine bay looks so much cleaner than mine
Bet he washed it specially for the camera
I did actually make use of a tin of "gunk" engine degreasant while the engine was out lol

 Re: Converting A 2.5 NA in to a 200tdi (big file)
Roz wrote:tat2_al wrote:jonmcghee wrote:Looks very neat Rozexellent job, your engine bay looks so much cleaner than mine
Bet he washed it specially for the camera
I did actually make use of a tin of "gunk" engine degreasant while the engine was out lol
I knew it !!! No landy engine is naturally that clean!

 Re: Converting A 2.5 NA in to a 200tdi (big file)
Getting there now, finaly got round to fitting a snorkel (wicks finest) still needs sealed and attatched prop. but ha ho we will get there.

jonmcghee- Posts : 334
Join date : 2009-11-02
Age : 52
Location : drumnadrochit
 Re: Converting A 2.5 NA in to a 200tdi (big file)
see on sunday 


jonmcghee- Posts : 334
Join date : 2009-11-02
Age : 52
Location : drumnadrochit
 Re: Converting A 2.5 NA in to a 200tdi (big file)
tat2_al wrote:Your a bloody snorkel tease!!
ow i know

jonmcghee- Posts : 334
Join date : 2009-11-02
Age : 52
Location : drumnadrochit
 Re: Converting A 2.5 NA in to a 200tdi (big file)
roz what clutch set up did you use paddoks do a heavy duty brit part just wondered if was any good.

jonmcghee- Posts : 334
Join date : 2009-11-02
Age : 52
Location : drumnadrochit
 Re: Converting A 2.5 NA in to a 200tdi (big file)
NOOOOOO!!!!!
Sorry, you said the B word!
Sh!tpart clutches are made of chocolate, I am a tight git and did my conversion on a very tight budget, but still spent the extra £30 on an AP (formerly borg & beck) clutch. It definately makes sense!
Sorry, you said the B word!
Sh!tpart clutches are made of chocolate, I am a tight git and did my conversion on a very tight budget, but still spent the extra £30 on an AP (formerly borg & beck) clutch. It definately makes sense!
 Re: Converting A 2.5 NA in to a 200tdi (big file)
cool thats me told  Thanks Roz
 Thanks Roz
jonmcghee- Posts : 334
Join date : 2009-11-02
Age : 52
Location : drumnadrochit
 Similar topics
» xmas run (big file)
» 2.5na conversion to 200tdi
» my 200tdi disco damaged
» 200tdi into series landy
» my 200tdi nearing compleation
» 2.5na conversion to 200tdi
» my 200tdi disco damaged
» 200tdi into series landy
» my 200tdi nearing compleation
Page 1 of 1
Permissions in this forum:
You cannot reply to topics in this forum

